Lab Information
Hi5 Seminar Series
Tutorials/How-Tos
Lab Information
Hi5 Seminar Series
Tutorials/How-Tos
NOTE: This is a supplement to our lectures. There are many details that will not be covered here that are covered in the lecture.
For this class, we are going to be working with OpenGL in Python. Before we go into the specifics, let's look at some generalities. OpenGL programs, regardless of language, typically have a very specific structure, shown below.
Include OpenGL libraries

Main Function:
     Initialize OpenGL & Windowing system

     While True:
          Check for user input (mouse, keyboard, joystick, etc)
          Call Display Function
          Send rendered image to monitor (swap buffers)

Display Function:
     Clear Screen
     Perform geometric transformations
     Specify geometry to draw (vertices, colors, textures, etc)
Notice that the first thing that happens in the Main Function is that OpenGL and a windowing system are initialized. OpenGL, by default, does not have its own windowing system (means of actually showing images in a GUI window). Mouse and keyboard input is also usually handled by your windowing system. As such, you'll need something else to handle this. For our purposes, we will be using PyGame to handle displaying windows and catching user input. You'll need to import these libraries:
from __future__ import division
from OpenGL.GL import *
from OpenGL.GLU import *
import pygame
I recommend setting up a class to hold your OpenGL functions, such as your init, event handlers, and display. Here is an example of a skeleton class that I use:
class GLContext():
     #init() - place calls here that you want to run before everything else
     def __init__(self, screen):
          self.screen=screen
          #Code goes here...
          return

     #check_events() - place code here to detect user input (keyboards, mice, etc)
     def check_events(self):
          #Code goes here...
          return

     #display() - place code here that displays your geometry
     def display(self):
          #Code goes here...
          return
You'll now need to focus on writing your main function. This is typically where you call your initialization functions for PyGame, OpenGL, and whatever else you're wanting to do upfront. It will also be the place that your display loop occurs. Your display loop is an infinite loop that calls your event handling and display functions over and over. You can think of each iteration of the loop as drawing a new image to the screen. It should look something like this:
main():
     pygame.init() #initializes PyGame
     screen = pygame.display.set_mode((600,600), pygame.OPENGL|pygame.DOUBLEBUF) #makes screen context for our application
     context=GLContext(screen) #makes OpenGL context for your application

     #Your display loop!
     while True:
          context.check_events() #checks for user events
          context.display() #calls display function
          pygame.display.flip() #swaps buffers and sends rendered image to screen


#ensures that main() gets called when the program runs
if __name__ == '__main__':
     try:
          main()
     finally:
          pygame.quit()
Now, we need to start filling in the functions in our GLContext class. Let's start by looking at your event handling function. At the very least, you'll want a way to close your window when you're finished with your program. You may also want the program to exit when the user presses a key (such as ESC). I recommend putting the following in your check_events() function:
        for event in pygame.event.get():
            if event.type == pygame.QUIT:
                exit()
            if event.type == pygame.KEYUP and event.key == pygame.K_ESCAPE:
                exit()
Now, we can start drawing stuff! The first thing that you'll need to do is to make sure your buffers are clear. This essentially means that you will clear the contents of your screen before drawing new stuff. You will also likely want to specify your background color (also known as the clear color).
        glClearColor(0.0, 0.0, 0.0, 1.0)
        glClear(GL_COLOR_BUFFER_BIT | GL_DEPTH_BUFFER_BIT)
We are going to start off using Legacy OpenGL, or older versions of the API. We are doing this as a way to get our feet wet in the subject before diving into the new, and arguably more complicated, modern OpenGL API. In Legacy OpenGL, all of the geometry you want to render has to be specified between two functions: glBegin() and glEnd(). glBegin() takes a single input argument that specifies the kind of geometry you'll be drawing. These are defined by a series of constants:
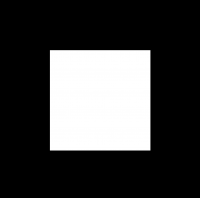
Let's use this to display a square. To do this we will use GL_QUADS (draws quadrilaterals)
glBegin(GL_QUADS)

glVertex2f(-0.5, -0.5)
glVertex2f(-0.5,  0.5)
glVertex2f( 0.5,  0.5)
glVertex2f( 0.5, -0.5)

glEnd()
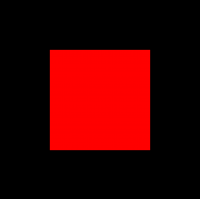
This will produce an image somewhat like the one shown below. Notice that the image is white. Unless you specify a color for your geometry, it will be white by default. Let's change the color of our quad to red. To do this, we will need to use the function glColor3f(). You can then specify the color of you wish to use as a series of red, green, and blue values (e.g. red → glColor3f(1.0, 0.0, 0.0), yellow → glColor3f(1.0, 1.0, 0.0) )

glBegin(GL_QUADS)

glColor3f(1.0, 0.0, 0.0)
glVertex2f(-0.5, -0.5)
glVertex2f(-0.5,  0.5)
glVertex2f( 0.5,  0.5)
glVertex2f( 0.5, -0.5)

glEnd()
 You can also specify colors for each vertex, if you so choose. By calling glColor3f() before the vertex you want to be colored, you can make it appear as such in the rendered image. If you specify different colors for each vertex, the colors will blend from one vertex to the next. Here is an example:
glBegin(GL_QUADS)

glColor3f(1.0, 0.0, 0.0) #Red
glVertex2f(-0.5, -0.5)
glColor3f(0.0, 0.0, 1.0) #Blue
glVertex2f(-0.5,  0.5)
glColor3f(0.0, 1.0, 0.0) #Green
glVertex2f( 0.5,  0.5)
glColor3f(1.0, 1.0, 0.0) #Yellow
glVertex2f( 0.5, -0.5)

glEnd()